Monthly Archives: February 2011
Fourth Week of Project 52
Fourth Week.. One Month!! Theme for this week was “Spirits” and in the broad manner that the word ‘spirits’ can be interpreted, I must say this was one of the toughest theme so far. Ghostly spirits, Human spirits, Alcoholic spirits, Wikipedia lists more than 50 different interpretations.
Initially I wanted to photograph with the theme of ghostly spirits. My idea for the photograph was to shoot outside in a park at night with a dark background highlighting few trees and animated lights on a human face that appears at multiple positions in the final photograph. Owing to the complexity of shooting this idea, I decided to keep this idea on hold (at least till summer nights) and I decided to go with the interpretation of alcoholic spirits. I thought this was the easiest route possible but this theme came with a limited scope of creativity, specially while shooting inside home. Not one of the best weeks in terms of exploring and I may revisit this theme again in future. On the brighter side, I already have shot the fifth week’s photo!!
Having said all of the above, I am reasonably happy with the following shot. Particularly with the focus on the drop hanging of the lemon wedge. I had just one another shot reasonably good out of 49 attempts!! Now, let’s keep the issue a rest and say Cheers to completing a month of Project 52!!
Update: Photograph for Fifth Week of Project 52 is up for the theme “Vegetable”. What motivated me to photograph this flyer from In-N-Out was how they showcased vegetables in this flyer without mentioning their famous and super-tasty hamburgers which is actually what they are known for and what they sell. (For anyone who doesn’t know about In-N-Out, they sell only hamburgers and thats the only item they have on their menu, variations include cheeseburgers and without the meat, a vegetable burger) I liked the advertisement for highlighting the vegetable components of their offerings. Offers a great insight into how people in US are looking into the health aspects of what they eat and how the companies are changing their advertisement methods to serve the demand.
Yoga Photography
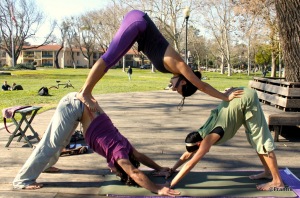
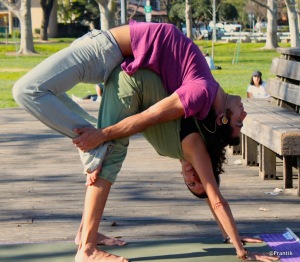
A couple of weeks ago, I had the sudden opportunity to photograph a few people performing yoga. They were from the Kaya Yoga group of Davis. Although I personally have a 2 year experience in practicing yoga in my early childhood, I had no previous experience in photographing yoga performance and was at a complete loss about how I approach the shoot. I was in bright sunlight. Thinking fast, I decided to set the camera with certain settings and not experiment when people were actually performing the yogas. From my experience, I knew I will hardly have 5 minutes to shot them in one particular position before they switch and I don’t want to waste that time changing my camera settings (and most certainly I couldn’t ask the people to perform the same position twice just because I wasn’t ready with my camera!). I set the camera ‘Aperture Priority’ mode and changed the value based on my position: If i was trying a closeup shot, I was lowering the F-stop value and for a shot that included a larger focus on the background, I used a higher F-stop value.
To show the extraordinary positions that these people were performing, I was naturally inclined to shoot photos with focus on the entire length of the performers. Additionally, I also wanted to capture some of their hardened expressions to capture the intensity. Unfortunately, I was standing at a considerable distance to not come in their way and I don’t have too many photographs in this area. After I came back home and read more about photographing yoga performers, I realized I was not too far off in my objectives from what is usually done by professionals 🙂 An interview with Ron Sombilon who captures yoga photos regularly is here. Following are some of the shots. I plan to upload some of the other images over time, specially on a dull day to motivate myself 😉 . After this experience, now I really want to photograph yoga performers against the backdrop of a sunset on a sea beach or in the studio with a black screen.
Organizing Photos
Five weeks into DSLR photography and I have a library of thousand photographs! Phew! Organizing them is another challenge. I spent 3~4hrs one day and decided to continue with Picasa over iPhoto. I will write down the reasons why I choose Picasa over iPhoto another day but there still is one aspect of Picasa that is yet under-developed and one of its biggest negative aspect is the inability to rank photos inside the Picasa environment.
For example, within the iPhoto environment, a 5-star system is available that you can utilize to browse through photos in different styles at different time. Like, if you want to sort out “good” photos from the entire collection, you can assign them a 3-star. For the “outstanding” photos, you can assign them a 5-start. Later on, depending on the situation, you can search for only the 5-star photographs and browse through them.
Picasa’s has a simpler method where you can “star” photographs as you browse them by simply hitting the spacebar. Unfortunately, when I have a thousand photos, this simple solution is insufficient and I need a more developed solution. Hoping a Gmail type multi-colored star solutions, I decided to check if any plug-in is available that supports such a solution. Unfortunately, the answer is NO.
So, (against my wishes), I came up with my personal 3-level hierarchical solution. The solution consists of 3 folders. Photos_all, Photos_Star, Photos_Flickr.
Photos_all is the library where all photos from the camera are exported to. After the transfer, as I browse along, I prefer to star them. The number of starred photos are approximately 40% of the photos shot. I next browse the starred-photos again to select a smaller number for basic editing (like cropping, straightening, etc). This is around 20% of the original set. Over time, this second layer of selection and retrieval was becoming increasingly difficult. For this purpose, I created the Photos_Star folder where these photos are moved to. Now, during the final step, I move 5% of these photos to the folder Photos_Flickr where I keep the photos I intend to upload to Flickr where I have decided to upload only my best shots (and naturally that number is very small).
In a way, the photos in Photos_Flickr photos represent my favorite shots and a quick slideshow of these photos from my laptop is also sufficient to show someone my photographic experiences. If someone shows more interest, I can then go to Photos_Star, which should be sufficient most of the times. If I have to upload photos to Facebook/PicasaWeb, where I upload a larger number of photos to share with my friends, I can also access Photos_Star to quickly do the job.
As a last bit of criticism and why Picasa must build the multi-starred solution, this process of creating multiple folders doesn’t work when I come back from a trip and I don’t want to create multiple sub-folders each time.
Chasing a car
I find panning photographs quite interesting and have been quite eager to try out the technique myself for quite sometime now. Panning is the technique of shooting one object with great sharpness, keeping the object in focus and make the background blurry and out of focus. The trick here is to focus on a moving object and move the camera along with the object so that the final photograph has a sharp, in focus object and the background is blurred.
There are two major hurdles to shooting panning: First, moving your camera in a synchronized manner with the moving object. Since this requires moving the camera for a considerable time (e.g. not an instant like 1/4000second), the second hurdle is getting the right exposure during the relatively longer exposure time.
To address the issues, I decided to try out panning at dusk on a cloudy day. The advantage was that I could keep my camera open for a longer time and yet the exposure would come out nice. For example, I read in the past that shutter times between 1/40s and 1/80s are good candidates for panning, I found them very difficult for me to actually move my hands (and camera) in that time. So for my shoots, I thought I could try out with a greater exposure time and yet the shots would get a good exposure. I shot the following photo with an exposure of 1/25s and EV compensation of +1/3.
One more thing: Panning is really really hard to shoot. I deleted ~75 out of the 80 photos I shot. It takes lot of patience. So, good luck! More on panning is here.


